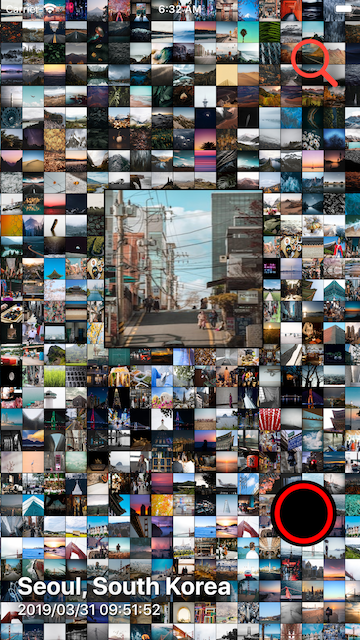
BSZoomGridScrollView
BSZoomGridScrollView is a powerful, pure swift iOS UI framework that provides the awesome grid scrollview containing your image array that are able to zoom, tracking your touch area.
Screenshots
Click to watch how it works in youtube
At a Glance
var body: some View {
    /// 😊 That's it.
    BSZoomGridScrollView(imagesToZoom: imagesToZoom,
                         powerOfZoomBounce: .regular,
                         numberOfColumns: 200,
                         numberOfRows: 10,
                         didLongPressItem: { selectedImage in
                            print("on long press : ", selectedImage)
                            /// Grab an image user end up choosing.
                            self.selectedImage = selectedImage

                            /// Present!
                            self.showSelectedImageView.toggle()
                         },
                         didFinishDraggingOnItem: { selectedImage in
                            print("on drag finish : ", selectedImage)
    })
    .edgesIgnoringSafeArea(.all)
    .sheet(isPresented:self.$showSelectedImageView) {
        /// The example view showing a picked up image.
        ShowingSelectedImageView(selectedImage: self.selectedImage)
    }
}
Features
- Designed for SwiftUI, SwiftUI 100% is supported.
- Complex grid ScrollView UI is provided out of box.
- Tracking user touch area on the grid scrollview, Zooming items is done out of box.
- BSZoomGridScrollView will return an image selected by a user, detected by the internal long press and pan gesture inside out of box.
- Grid UI can be styled for number of columns, rows, zoom effect and images you would like to input to show in the grid.
Example
To run the example project, clone the repo, and run pod install from the Example directory first.
It includes examples for UIKit as well as SwiftUI.
Requirements
- iOS 13.0 or later
- Swift 5.0 or later
- Xcode 11.0 or later
Getting Started
- SwiftUI
import SwiftUI

/// 🥳 # Step1: let's import!
import BSZoomGridScrollView

struct ContentView: View {
    var itemsToZoom: [UIImage] = {
        var images = [UIImage]()
        for i in 0...29 {
            images.append(UIImage(named: "yourImage\(i)") ?? UIImage())
        }
        return images
    }()

    var body: some View {
        /// 😊 # Step2. That's it. completed!
        BSZoomGridScrollView(itemsToZoom: itemsToZoom,
                             powerOfZoomBounce: .regular,
                             isBeingDraggingOnItem:{ selectedImage in
                                ///
                             },
                             didLongPressItem: { selectedImage in
                                /// Grab an image user ends up choosing.
                             },
                             didFinishDraggingOnItem: { selectedImage in
                                /// Grab an image user ends up choosing.
        })
        .edgesIgnoringSafeArea(.all)
    }
}- UIKit
///
/// To use BSZoomGridScrollView,
/// Please, Follow steps written in the comments with icon like 😀.
///

import SwiftUI
import UIKit

///
// 😚 #Step1: import BSZoomGridScrollView!
///
import BSZoomGridScrollView

class ViewController: UIViewController {

    ///
    // 😋 #Step2: declare BSZoomGridScrollView
    ///
    private lazy var zoomGridScrollViewController: BSZoomGridScrollViewController = { [unowned self] in
        ///
        /// It can be used on both SwiftUI and UIKit.
        /// To see how it works on SwiftUI,
        /// please refer to comments in SwiftUI directory -> ContentView.swift
        ///
        return BSZoomGridScrollViewController(itemsToZoom: self.itemsToZoom,
                                              powerOfZoomBounce: .regular,
                                              scrollEnableButtonTintColor: .black,
                                              scrollEnableButtonBackgroundColor: .white,
                                              isBeingDraggingOnItem:{ [unowned self] selectedImage in
                                                 ///
                                              },
                                              didLongPressItem: { [unowned self] selectedImage in
                                                /// Grab an image user end up choosing.
                                              },
                                              didFinishDraggingOnItem: { [unowned self] selectedImage in
                                                /// on drag finished
                                              })
    }()

    ///
    // prepare any item array to feed to BSZoomGridScrollViewController.
    ///
    private var itemsToZoom: [Any] = {
        var images = [UIImage]()
        for i in 0...29 {
            images.append(UIImage(named: "s\(i)") ?? UIImage())
        }
        return images
    }()

    ///
    // 😁 #Step3: Present it!
    ///
    @IBAction func goToBSZoomGridScrollView(_ sender: Any) {
        ///
        // 😎 That's all. well done.
        ///

        self.present(UINavigationController(rootViewController: zoomGridScrollViewController),
                     animated: true,
                     completion: nil)
    }

    ///
    // MARK: - ViewController LifeCycle Methods
    ///
    override func viewDidLoad() {
        super.viewDidLoad()
    }

    override func didReceiveMemoryWarning() {
        super.didReceiveMemoryWarning()
    }
}
Installation
There are four ways to use BSZoomGridScrollView in your project:
- using CocoaPods
- using Swift Package Manager
- manual install (build frameworks or embed Xcode Project)
Installation with CocoaPods
CocoaPods is a dependency manager for Objective-C, which automates and simplifies the process of using 3rd-party libraries in your projects. See the Get Started section for more details.
Podfile
First,
pod 'BSZoomGridScrollView'then in your root project,
pod installInstallation with Swift Package Manager (Xcode 11+)
Swift Package Manager (SwiftPM) is a tool for managing the distribution of Swift code as well as C-family dependency. From Xcode 11, SwiftPM got natively integrated with Xcode.
BSZoomGridScrollView support SwiftPM from version 5.1.0. To use SwiftPM, you should use Xcode 11 to open your project. Click File -> Swift Packages -> Add Package Dependency, enter BSZoomGridScrollView repo's URL. Or you can login Xcode with your GitHub account and just type BSZoomGridScrollView to search.
After select the package, you can choose the dependency type (tagged version, branch or commit). Then Xcode will setup all the stuff for you.
If you're a framework author and use BSZoomGridScrollView as a dependency, update your Package.swift file:
let package = Package(
    dependencies: [
        .package(url: "https://github.com/boraseoksoon/BSZoomGridScrollView", from: "0.1.1")
    ],
    // ...
)
Disclamer
It was done for my fun.
Author
License
BSZoomGridScrollView is available under the MIT license. See the LICENSE file for more info.
References
Observable : Photos browsing iOS app where you can download the photos for free as you like.


