SimCLR PyTorch
This is an unofficial repository reproducing results of the paper A Simple Framework for Contrastive Learning of Visual Representations. The implementation supports multi-GPU distributed training on several nodes with PyTorch DistributedDataParallel.
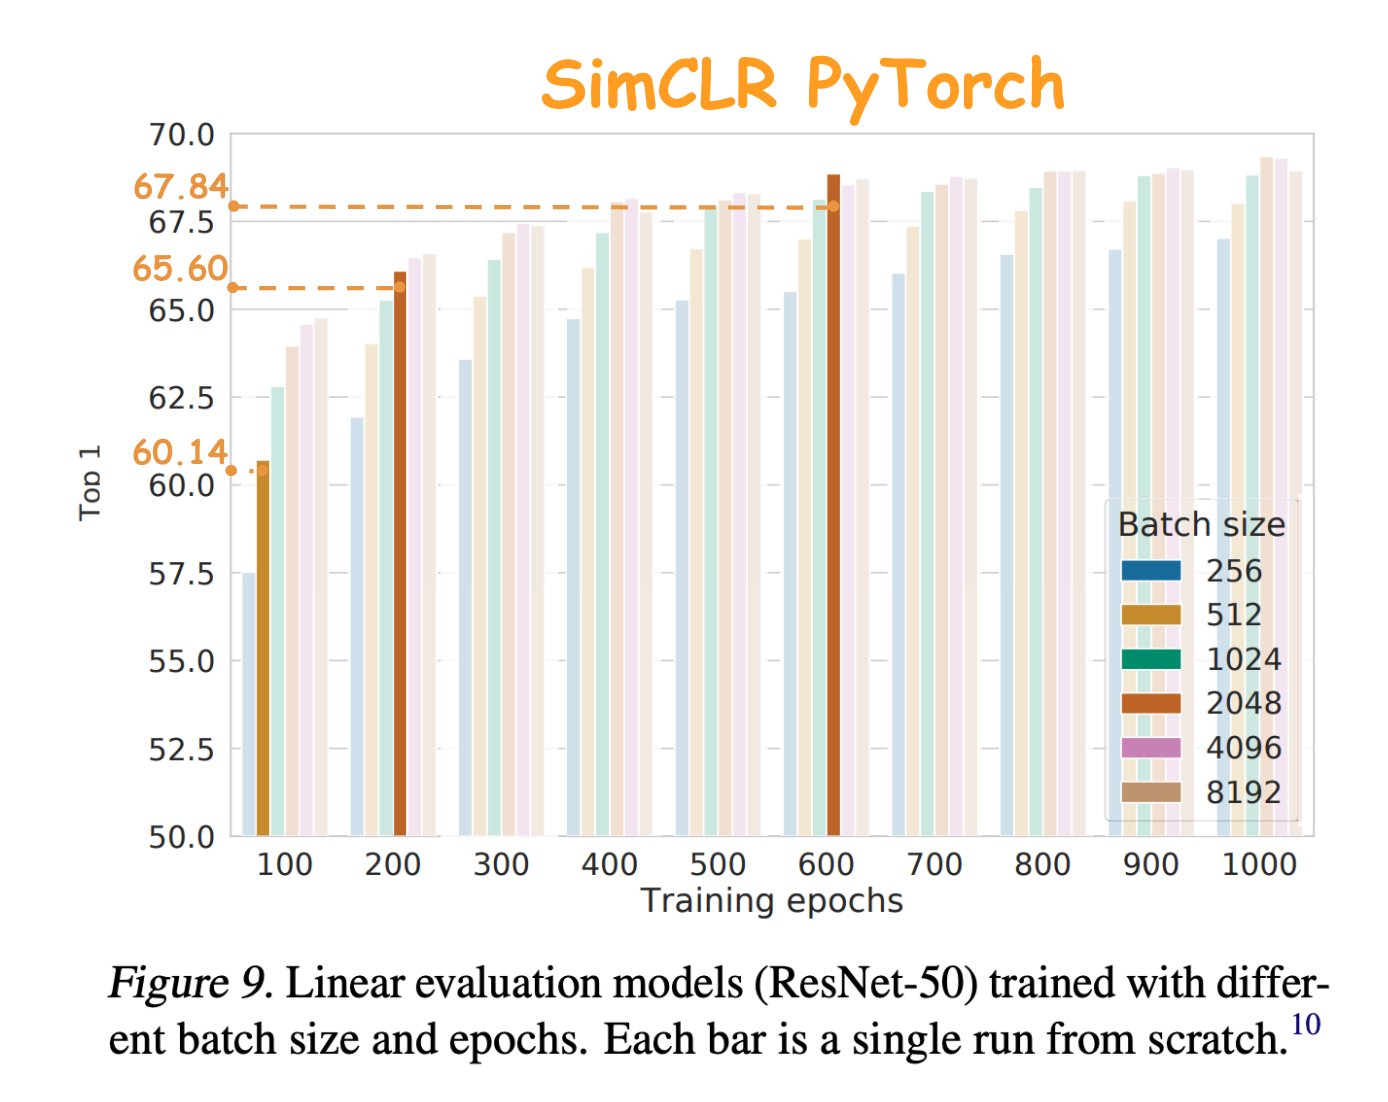
How close are we to the original SimCLR?
The implementation closely reproduces the original ResNet50 results on ImageNet and CIFAR-10.
| Dataset | Batch Size | # Epochs | Training GPUs | Training time | Top-1 accuracy of Linear evaluation (100% labels) | Reference |
|---|---|---|---|---|---|---|
| CIFAR-10 | 1024 | 1000 | 2v100 | 13h | 93.44 | 93.95 |
| ImageNet | 512 | 100 | 4v100 | 85h | 60.14 | 60.62 |
| ImageNet | 2048 | 200 | 16v100 | 55h | 65.58 | 65.83 |
| ImageNet | 2048 | 600 | 16v100 | 170h | 67.84 | 68.71 |
Pre-trained weights
Pre-trained weights can be downloaded with a command line interface as following:
pip3 install wldhx.yadisk-direct
curl -L $(yadisk-direct https://yadi.sk/d/Sg9uSLfLBMCt5g?w=1) -o pretrained_models.zip
unzip pretrained_models.zip
To eval the preatrained CIFAR-10 linear model and encoder use the following command:
python train.py --problem eval --eval_only true --iters 1 --arch linear \
--ckpt pretrained_models/resnet50_cifar10_bs1024_epochs1000_linear.pth.tar \
--encoder_ckpt pretrained_models/resnet50_cifar10_bs1024_epochs1000.pth.tar
To eval the preatrained ImageNet linear model and encoder use the following command:
export IMAGENET_PATH=.../raw-data
python train.py --problem eval --eval_only true --iters 1 --arch linear --data imagenet \
--ckpt pretrained_models/resnet50_imagenet_bs2k_epochs600_linear.pth.tar \
--encoder_ckpt pretrained_models/resnet50_imagenet_bs2k_epochs600.pth.tar
Enviroment Setup
Create a python enviroment with the provided config file and miniconda:
conda env create -f environment.yml
conda activate simclr_pytorch

export IMAGENET_PATH=... # If you have enough RAM using /dev/shm usually accelerates data loading time
export EXMAN_PATH=... # A path to logs
Training
Model training consists of two steps: (1) self-supervised encoder pretraining and (2) classifier learning with the encoder representations. Both steps are done with the train.py script. To see the help for sim-clr/eval problem call the following command: python source/train.py --help --problem sim-clr/eval.
Self-supervised pretraining
CIFAR-10
The config cifar_train_epochs1000_bs1024.yaml contains the parameters to reproduce results for CIFAR-10 dataset. It requires 2 V100 GPUs. The pretraining command is:
python train.py --config configs/cifar_train_epochs1000_bs1024.yaml
ImageNet
The configs imagenet_params_epochs*_bs*.yaml contain the parameters to reproduce results for ImageNet dataset. It requires at 4v100-16v100 GPUs depending on a batch size. The single-node (4 v100 GPUs) pretraining command is:
python train.py --config configs/imagenet_train_epochs100_bs512.yaml
Logs
The logs and the model will be stored at ./logs/exman-train.py/runs/<experiment-id>/. You can access all the experiments from python with exman.Index('./logs/exman-train.py').info().
Linear Evaluation
To train a linear classifier on top of the pretrained encoder, run the following command:
python train.py --config configs/cifar_eval.yaml --encoder_ckpt <path-to-encoder>
The above model with batch size 1024 gives 93.5 linear eval test accuracy.
Pretraining with DistributedDataParallel
To train a model with larger batch size on several nodes you need to set --dist ddp flag and specify the following parameters:
--dist_address: the address and a port of the main node in the<address>:<port>format--node_rank: 0 for the main node and 1,... for the others.--world_size: the number of nodes.
For example, to train with two nodes you need to run the following command on the main node:
python train.py --config configs/cifar_train_epochs1000_bs1024.yaml --dist ddp --dist_address <address>:<port> --node_rank 0 --world_size 2
and on the second node:
python train.py --config configs/cifar_train_epochs1000_bs1024.yaml --dist ddp --dist_address <address>:<port> --node_rank 1 --world_size 2
The ImageNet the pretaining on 4 nodes all with 4 GPUs looks as follows:
node1: python train.py --config configs/imagenet_train_epochs200_bs2k.yaml --dist ddp --world_size 4 --dist_address <address>:<port> --node_rank 0
node2: python train.py --config configs/imagenet_train_epochs200_bs2k.yaml --dist ddp --world_size 4 --dist_address <address>:<port> --node_rank 1
node3: python train.py --config configs/imagenet_train_epochs200_bs2k.yaml --dist ddp --world_size 4 --dist_address <address>:<port> --node_rank 2
node4: python train.py --config configs/imagenet_train_epochs200_bs2k.yaml --dist ddp --world_size 4 --dist_address <address>:<port> --node_rank 3
Attribution
Parts of this code are based on the following repositories:v
- PyTorch, PyTorch Examples, PyTorch Lightning for standard backbones, training loops, etc.
- SimCLR - A Simple Framework for Contrastive Learning of Visual Representations for more details on the original implementation
- diffdist for multi-gpu contrastive loss implementation, allows backpropagation through
all_gatheroperation (see models/losses.py#L58) - Experiment Manager (exman) a tool that distributes logs, checkpoints, and parameters-dicts via folders, and allows to load them in a pandas DataFrame, that is handly for processing in ipython notebooks.
- NVIDIA APEX for LARS optimizer. We modeified LARC to make it consistent with SimCLR repo.
Acknowledgements
- This work was supported in part through computational resources of HPC facilities at NRU HSE
