Tiny Door and Window Sensor/Alarm with Ultra Low Standby Power (<1µA)
Update 03. February 2017
Changes v0.3:
- Switched from NodeMCU/Lua to the Arduino IDE
- Series resistor for the reed switch
- Pulldown resistor for the shutdown signal
- Error and OK led removed
The following description is not up to date!
A Ultra Low Standby Power Project which pushes the state of a connected switch(reed/magnet or any other) every time it changes to one of 4 different services(you need to chooose and configure one).
Available(ready to use) services right now (can be easily expanded):
- IFTTT
- Pushingbox
- Thingspeak
- ArrestDB(this is not an online service but a nice php script which writes the state of the switch to a database (on pi))
/3/4/5/6/7
Partlist:
- ATtiny25(45/85)
- Voltage regulator with enable/shutdown pin (tested with SPX3819, AS1363, LT1763)
- ESP-07 / ESP-12(E)
- Changeover/SPDT Reed switch
- Some resistors, capacitors, and 3 leds(r,g,b)
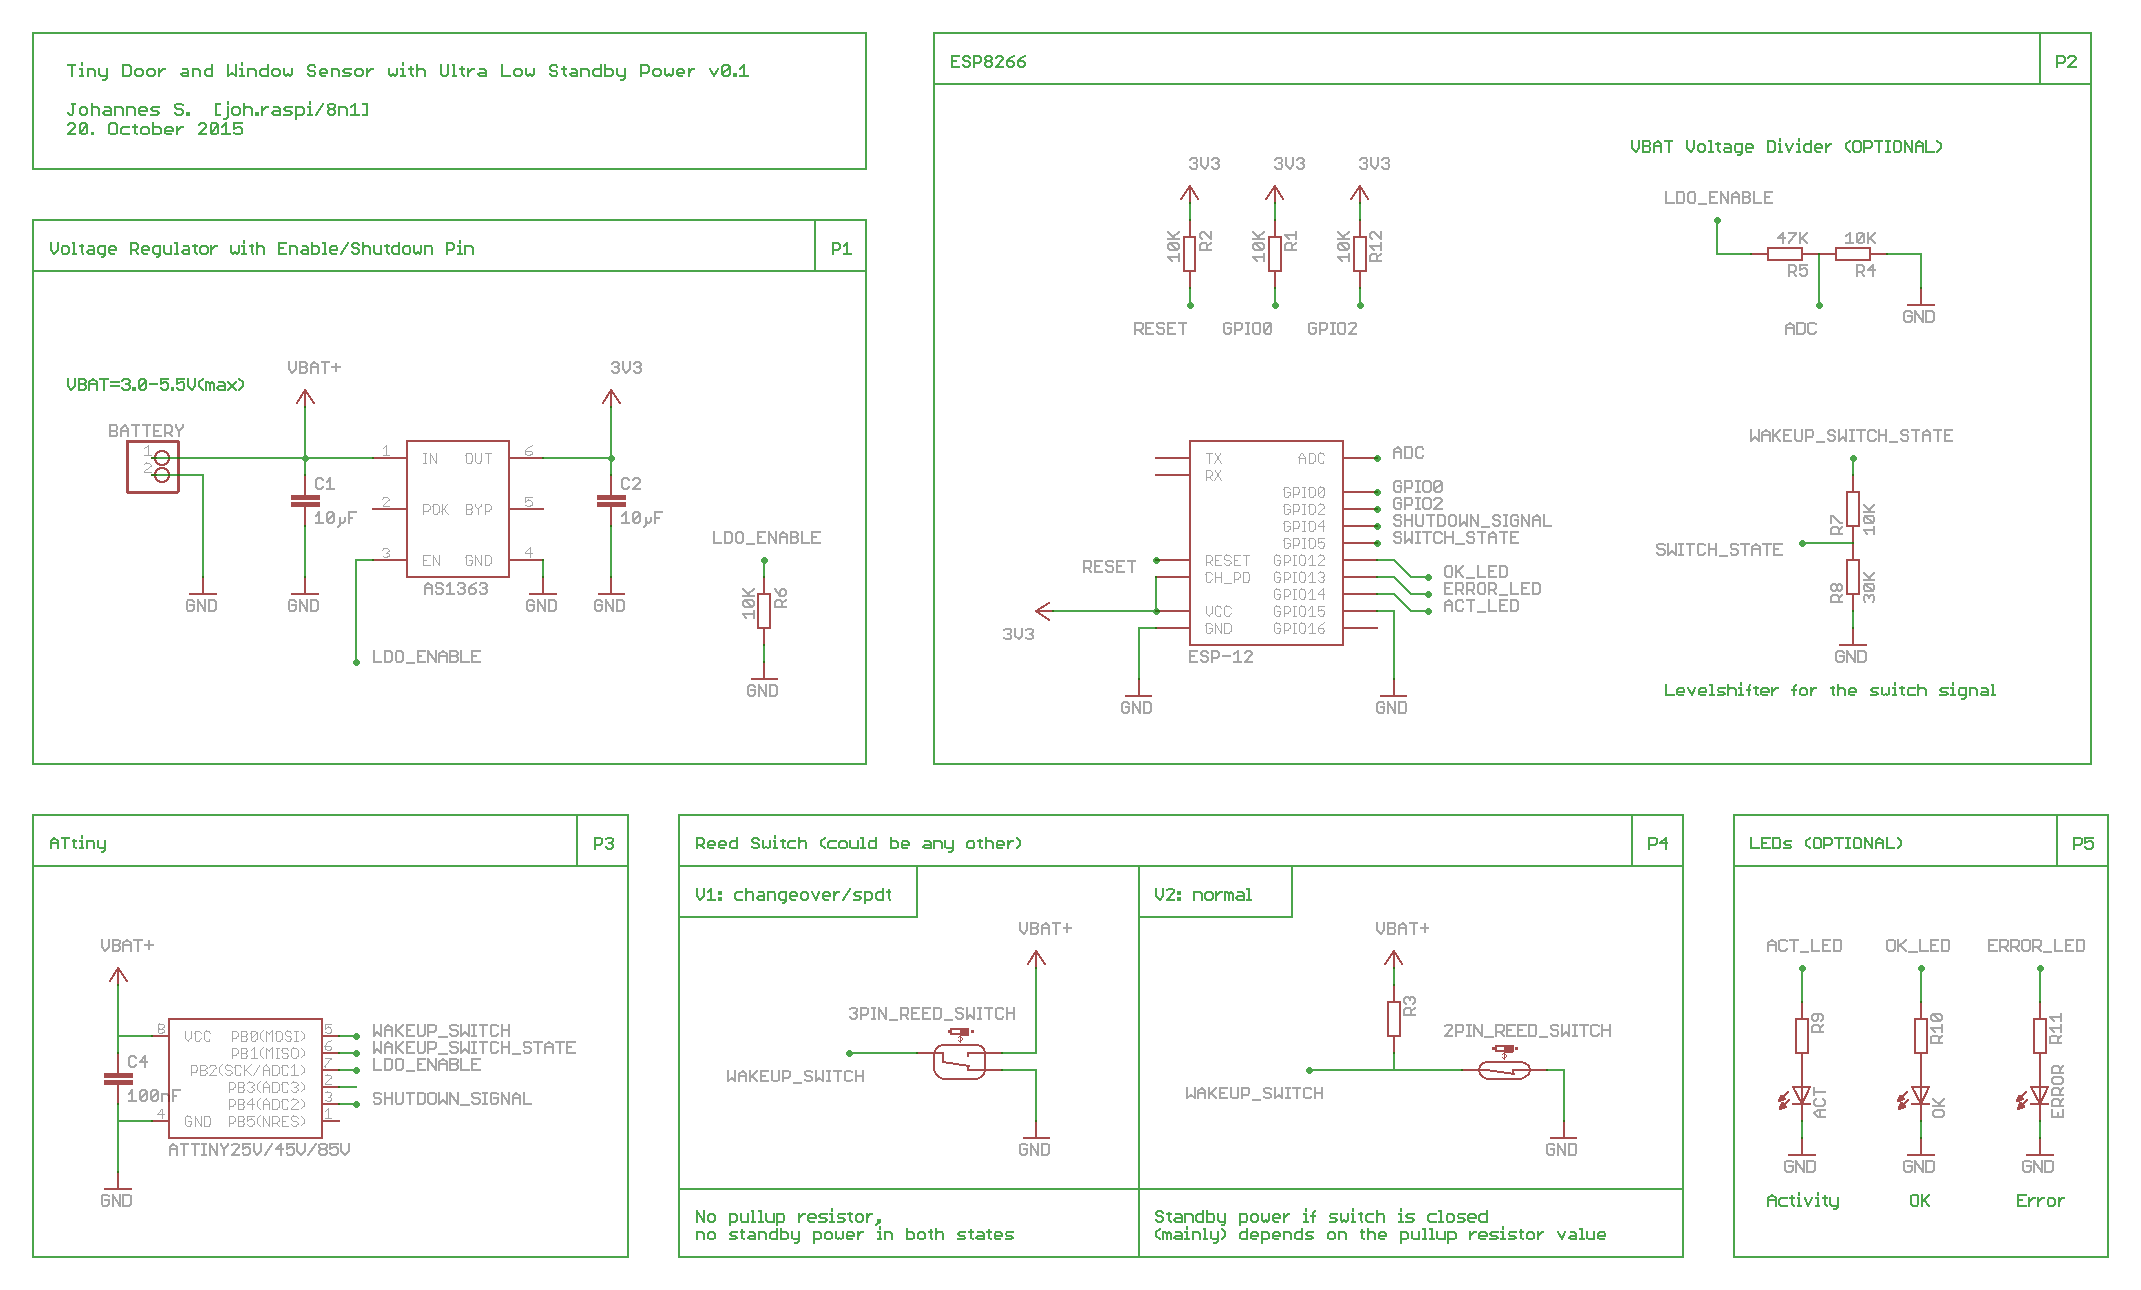
Schematic
The standby current consumption is about 330nA(Nanoampere) @3.8V. The biggest current sucker in standby is the ATtiny in power-down sleep mode (~300nA).
Beside a few other tricks I've had to come up with to get the current consumption really that low, a in some of my usecases important one is to use a changover/SPDT (3pin) wakeup switch(the one with 3 pins). Using one of these I can get rid of the pullup resistor that is otherwise needed when using a normal (2pin) switch. This means that the current consumption is in both states(door/window is open AND door/window is closed) equaly low.
Procedure
The ATtiny wakes up from power-down through a pin change interrupt triggered by opening or closing the window/door(pressing or releasing the switch). The ATtiny activates the LDO and therefore the ESP-12. The ESP connects to the wifi, optionaly collects some data(wifi signal strength, temperature, battery voltage), reads the state of the (wakeup) switch and sends it along with the other colleted data to the choosen service. After that the ESP signals the ATtiny to shutdown the LDO and the system goes into standby, waiting for the next pc interrupt.
Installation ESP
- Clone/download this repository
- Flash the nodemcu firmware (I'm using esptool.py for this)
- Configure the two lua files (->Configuration ESP)
- Upload all lua files (I'm using ESPlorer for that)
- Execute "compile_files.lua"
- Done. Restart the ESP to test.
Configuration ESP
Only two files must be edited.
- Open and edit "config.lua"
- Open and edit the activated service request script ("..._request.lua")
Installation ATtiny
- Get the latest Arduino IDE (tested with 1.6.5)
- Install attiny support using the "Boards Manager" (Menu: Tools->Board:...->Boards Manager->attiny)
- Compile and upload the sketch (no configuration needed)
- (go sure the fusebits are set correct (default value))
Pictures
Breadboard setup
Using one of my own Breakout Adapters:
A small pcb
I've also designed a small pcb for this project: (More about the pcb in the near futre.)

More details and explainations: (in german)
Resources
- NodeMCU Firmware(the included firmware has been built using this service): http://frightanic.com/nodemcu-custom-build/
- NodeMCU API: https://github.com/nodemcu/nodemcu-firmware/wiki/nodemcu_api_en
- ATtiny25/45/85 Datasheet: http://www.atmel.com/Images/atmel-2586-avr-8-bit-microcontroller-attiny25-attiny45-attiny85_datasheet.pdf
- Fusebit Calculator: http://www.engbedded.com/fusecalc/
- SPX3819: http://www.exar.com/common/content/document.ashx?id=615&languageid=1033&type=datasheet&part=spx3819
- AS1363: http://ams.com/eng/content/download/12507/219217/12422
Services


